I used to think quinoa was just fancy birdseed, honestly! For years, I avoided it because every time I tried it at a restaurant, it was either mushy or tasted like dirt. But then I realized that about 70% of home cooks struggle with the texture of ancient grains, so I wasn’t alone. Once I figured out the secret to this Mediterranean Quinoa Pilaf, my kitchen life changed forever!
This dish is a total lifesaver when you’re tired but want something that actually tastes good and keeps you full. It’s bright, it’s zesty, and it feels like a vacation in a bowl.

Why This Mediterranean Quinoa Pilaf is a Game-Changer
Look, I’ve been teaching people how to cook for a long time, and if there’s one thing I’ve learned, it’s that we all want food that makes us feel good without taking three hours to make. This Mediterranean Quinoa Pilaf is exactly that.
I remember back when I first started experimenting with grains, I made a huge batch of what I thought was going to be a “killer” pilaf. I didn’t realize that quinoa has this bitter coating called saponin. I didn’t wash it. It was so bitter my kids wouldn’t even touch it! We ended up ordering pizza, which was a total fail on my part.
The Protein Powerhouse
But once I got it right, man, it was a win. Quinoa is a complete protein, which is kind of a big deal if you’re trying to eat less meat in 2026. It’s got all those amino acids your body craves.
I often tell my students that this dish is like a blank canvas. You can throw in whatever is wilting in your crisper drawer and it still tastes like a million bucks. It’s a total game-changer for those nights when you’re staring at the fridge at 6 PM with zero energy.
A Real Life-Saver
The Mediterranean vibes are just a bonus. Honestly, the mix of the salty feta and the crunch of the cucumbers makes it feel way more expensive than it actually is.
I’ve found that it actually tastes better the next day. The lemon juice and the olive oil kind of soak into the grains. It’s like the flavors are having a little party in the container while you sleep.
Don’t Overthink It
You don’t need to be some master chef to pull this off. Even if you’re someone who burns toast, you can handle this pilaf. Just watch your water levels and don’t let it get too soggy.
I used to be so scared of “exotic” grains, but now this is a weekly staple in my house. My husband even asks for it, and he’s a total “meat and potatoes” kind of guy. It’s just that good.

Essential Ingredients for Your Quinoa Pilaf
I remember when I first tried making this, I just grabbed whatever was sitting in the back of my fridge. It was a huge mistake! To get that real flavor, you have to be a little picky about what goes into the bowl. It’s not about being fancy or spending a ton of money, it’s just about choosing things that actually taste like something. I tell my students all the time that a recipe is only as good as the stuff you put in it. For this Mediterranean Quinoa Pilaf, we want things that are crunchy, salty, and bright.
Picking the Best Produce
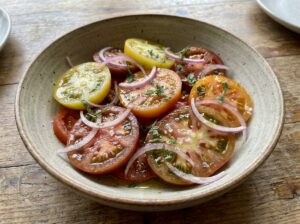
You really want to look for the crunchiest cucumbers you can find. I usually go for the English ones because the skin isn’t so thick and bitter. If you use the regular ones, make sure you peel them first or it feels like you’re chewing on plastic. Then there’s the tomatoes. Please, don’t use those hard, pale pink ones from the big grocery store if you can help it. Get the cherry tomatoes or the ones still on the vine. They have so much more sugar in them. When you chop them up, all that juice mixes with the quinoa and makes it taste amazing. I like to cut mine into small pieces so you get a bit of everything in every single bite.
The Dressing Secret
The dressing is where people usually mess up. I used to buy the bottled stuff because it was easier, but man, the taste was just off. For this pilaf, you need real lemons. Squeeze them yourself! That little plastic bottle shaped like a lemon? Leave it on the shelf. You also need some good olive oil. It doesn’t have to be the most expensive bottle in the store, but it should taste like olives, not just grease. When you mix the lemon juice with the oil, it creates this zingy sauce that wakes up the whole dish. Sometimes I add a little bit of dried oregano too, just to give it that extra kick.
The Flavor Bombs
Finally, let’s talk about the salty bits. Feta cheese is a must for me. I prefer the kind that comes in a block of brine because it stays creamier. The pre-crumbled kind can be a little dry, like eating chalk. And olives! I know some people hate them, but Kalamata olives add this deep, salty flavor that you just can’t get anywhere else. If you are vegan, you can skip the cheese and maybe add some extra chickpeas or even some toasted pine nuts. It’s all about finding that balance between the healthy grain and the fun toppings. Don’t be afraid to taste as you go!

Step-by-Step Instructions: How to Cook Fluffy Quinoa
Cooking quinoa used to be a real struggle for me. I remember one time I invited my sister over for dinner, and the quinoa came out so sticky it looked like lumpy mashed potatoes. It was embarrassing! I ended up hiding the pot in the sink and serving extra bread instead. But through a lot of trial and error in my own kitchen, I learned that getting the perfect base for your Mediterranean Quinoa Pilaf isn’t about luck. It is about a few simple tricks that I now teach all my students. If you follow these steps, you won’t have to worry about mushy grains ever again.
The All-Important Rinse
The very first thing you have to do is wash your quinoa. I know, it sounds like a pain, and you might want to skip it, but please don’t! Quinoa has a natural coating called saponin. If you leave it on, your pilaf will taste like soap or dirt. I just put the dry grains in a fine-mesh strainer and run cold water over them for about a minute. I usually rub the grains with my fingers while the water runs. You will see some bubbles forming, which is that bitter coating washing away. Once the water runs clear, you are good to go. This one step makes a massive difference in how the final dish tastes.
The Toasting Trick
After the rinse, I like to do something that most people forget: toasting. I put the wet quinoa straight into the pot over medium heat before adding any water. I stir it around for about three or four minutes. You will hear it start to pop a little bit, and it will smell like toasted nuts. This dries out the extra water from the rinse and locks in a deeper flavor. It also helps the grains stay separate later on. I’ve found that skipping this part is why some people find quinoa boring. Toasting gives it a “pop” that really stands out when you mix it with the lemon and veggies later.
The Perfect Ratio and the Wait
Now, for the liquid. Use a one-to-two ratio. That means for every one cup of quinoa, you use two cups of water or broth. I usually use vegetable broth because it adds more flavor than plain water. Bring it to a boil, then turn the heat way down to a low simmer and put the lid on. Let it cook for about fifteen minutes. Here is the big secret: once the water is gone, turn off the heat but leave the lid on! Let it sit for at least five or ten minutes. This lets the steam finish the job. When you finally take the lid off and use a fork to fluff it up, it will be light, airy, and perfect for your Mediterranean Quinoa Pilaf. Never use a spoon to stir it at the end, or you might smash the delicate grains!

Common Mistakes and How to Avoid Them
Even though this Mediterranean Quinoa Pilaf is pretty simple, I have seen plenty of my students make the same few blunders. It’s honestly heartbreaking to see someone put in the work only to end up with a bowl of mush that nobody wants to eat. I’ve made every single one of these mistakes myself, usually when I was in a rush or trying to do three things at once in the kitchen. Learning what not to do is just as important as knowing the steps to follow. If your first try didn’t turn out great, don’t worry—most of the time, it’s just one little thing you need to change to make it taste like it came from a restaurant.
Don’t Add the Veggies Too Soon
This is probably the biggest mistake I see. You get the quinoa cooked, and you’re so excited to eat that you dump the cucumbers and tomatoes in while the grain is still steaming hot. What happens next? The heat from the quinoa basically cooks the vegetables. Your crisp cucumbers turn soft, and the tomatoes get all watery and gross. I always tell people to spread the cooked quinoa out on a large plate or a baking sheet to let it cool down to room temperature first. This way, when you mix everything together, the vegetables stay crunchy and fresh. It makes the whole dish feel much more like a salad and less like a hot stew.
Watch Out for Extra Water
Another thing that ruins a good pilaf is hidden moisture. Sometimes, even if you follow the ratio, there might be a little bit of water left at the bottom of the pot. If you just leave it there, the quinoa on the bottom will keep soaking it up and get slimy. I usually tip the pot slightly to see if any liquid runs to the side. If it does, I just drain it off or put it back on the heat for thirty seconds without a lid. Also, make sure you dry your veggies after washing them. If you toss wet parsley or soggy tomatoes into the bowl, it thins out the dressing and makes the whole thing taste bland. You want the dressing to coat the grains, not get watered down by a leaky tomato.
Don’t Be Shy with the Seasoning
Quinoa is very healthy, but let’s be honest—it doesn’t have much flavor on its own. I’ve tasted so many versions of this dish that were just boring because the cook was scared to use salt. You need to season the water you cook the quinoa in, and then you probably need to add another pinch of salt once the whole thing is put together. The acid from the lemon juice helps a lot, but salt is what really makes the flavors of the olives and feta pop. If you take a bite and it feels like something is missing, it’s almost always salt or a bit more lemon. Don’t be afraid to keep tasting it until it makes your mouth water! This is the best way to learn how to balance flavors in your own kitchen.

Storage and Meal Prep Tips for 2026
I’ve had plenty of times where I made a big pot of something on Sunday, thinking I was being so smart, only to throw half of it away by Thursday because it turned into a weird science project. That is the worst feeling! With this Mediterranean Quinoa Pilaf, you don’t really have to worry about that as much. It is one of the sturdier things I make in my kitchen. I actually think it tastes better the next day because the flavors really mix together well. Here is how I keep mine fresh so it tastes just as good on day four as it did on day one.
How Long Does it Stay Good?
In my experience, you can keep this pilaf in the fridge for about four to five days without any issues. I always try to use glass containers because I feel like plastic starts to smell like onions after a while, and nobody wants that. Make sure the lid is on tight! If you leave it open, the quinoa starts to dry out and gets a bit crunchy in a bad way. I usually tell my students to portion it out into small containers right away. That way, you aren’t opening and closing the big bowl every day, which keeps the air out and helps the food stay fresh for much longer.
Keeping the Flavor Bright
One thing I noticed is that the lemon juice can lose its “zing” after a couple of days in the fridge. The quinoa soaks up all that acid like a sponge. If I know I am going to eat this later in the week, I sometimes keep a few extra lemon wedges in a little baggie. When I’m ready to eat my lunch at school, I just give it a fresh squeeze. It wakes up the whole dish again! Also, if you find that the feta is getting a bit soft, you can wait to add the cheese until right before you eat. It keeps that nice salty crumble instead of it melting into the grain.
Meal Prep Hacks for Success
If you are really short on time, you can prep the parts of this Mediterranean Quinoa Pilaf separately. I sometimes cook a double batch of the quinoa and freeze half of it! Yes, you can freeze cooked quinoa and it works great. Then, throughout the week, I just chop up the fresh veggies and toss them in. It makes me feel like I have my life together even when things are super chaotic. Just remember not to freeze the veggies—that is a mistake you only make once! Keep the fresh stuff fresh and the cooked stuff ready to go, and you’ll never have to worry about what’s for lunch again. It’s a great way to stay on track with your health goals.

Bringing it All Together: Your New Favorite Meal
Well, we have reached the end of our little cooking lesson today. I really hope you feel a lot more confident about making this Mediterranean Quinoa Pilaf than I did when I first started out. Looking back at all those crunchy or bitter batches I made years ago, I really wish someone had just sat me down and explained the basics like this. It really isn’t hard once you get the hang of it, and the payoff is so worth it. You get a meal that makes you feel energized and healthy, which is something we all need more of in 2026.
Just remember the big things we talked about. First, always rinse that quinoa! Don’t let that bitter soap taste ruin your dinner. Second, give it a quick toast in the pan to get that nutty smell and flavor. It only takes three minutes but it changes everything. Third, let it cool down before you dump in your fresh veggies. This keeps the crunch alive and stops everything from turning into a soggy mess. And finally, don’t be shy with the salt and lemon. Those are the two things that turn a boring grain into a meal you actually want to eat.
I’ve seen so many of my students go from being terrified of “health food” to making this pilaf every single week. It is funny how one good recipe can change your whole outlook on cooking. It’s not about being a pro in the kitchen; it is just about having a few solid dishes in your back pocket that you know will work every time. This Mediterranean Quinoa Pilaf is definitely one of those for me, and I know it can be for you too.
I really think the best part of this whole process is that feeling when you sit down with a big, colorful bowl of food that you made yourself. There is something really satisfying about knowing exactly what went into your meal—no hidden sugars or weird stuff. Just fresh veggies, good grains, and a bit of effort. If you are just starting your health journey, don’t try to change everything at once. Just start with one recipe like this. If you found this helpful, please share it on Pinterest so your friends can try it too! Happy cooking!