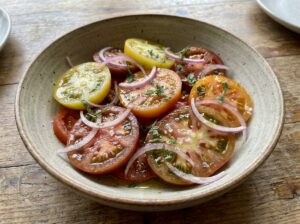
Finding a healthy dinner that doesn’t take forever to cook is a real struggle during the school week. I used to just grab takeout way too often, but my wallet wasn’t happy about it, so I started making this Easy Mediterranean Bean Soup. It is seriously a lifesaver for those busy nights when you just want something warm and comforting without the hassle. It’s packed with fresh veggies and hearty beans, but the best part is you can basically just dump everything into one pot and let it do its thing. Honestly, it tastes like it simmered all day long, but it’s ready in like 30 minutes. You really don’t need to be a pro in the kitchen to get this one right.
 1")
Why This Soup Will Become Your New Favorite
I have to tell you, finding a recipe that actually sticks in my weekly rotation is pretty rare. Usually, I try something once, it’s okay, and then I completely forget about it a week later. But this soup? It stuck. It’s honestly one of those meals that saves me when I’m staring at the clock at 5:30 PM, totally exhausted, wondering how I’m going to feed everyone before homework time starts. It’s not fancy, and it doesn’t try to be. It’s just good, solid food that warms you up from the inside out.
It’s Ready Before You Know It
I am not joking when I say this comes together fast. You know those recipes that claim to be “30 minutes” but then you spend 20 minutes just chopping onions and washing herbs? This isn’t like that. The prep is super minimal. If you buy pre-chopped veggies (which I totally do sometimes, no shame!), it’s basically just opening cans and tossing things in a pot. It’s a real “dump and cook” kind of situation. You get that rich, slow-cooked taste—like you’ve been tending to a pot on the stove all Sunday afternoon—but you actually just threw it together quickly after work. For a teacher like me who is on her feet all day, standing over a hot stove for an hour is the last thing I want to do.
The Flavor is Surprisingly Deep
A lot of quick soups taste like… well, hot salted water. They lack that deep, savory goodness that makes you want to keep eating. The trick here is the combination of the starchy beans and the acid from the tomatoes. The beans break down a little bit as they cook, which makes the broth creamy without needing to add any heavy cream. Then, when you add the tomatoes and a fresh squeeze of lemon? It wakes the whole thing up. It’s savory, it’s bright, and it’s comforting all at once. My kids used to complain about “boring soup nights,” but they actually ask for seconds of this one because it actually tastes like something.
It’s Secretly Good for You
I don’t like to preach about “health food” because I think food should just be enjoyed, not analyzed. But it is nice knowing that this bowl is packed with good stuff. The beans are full of fiber, which keeps you full for a long time. I used to eat a sandwich for lunch and be starving by 3 PM, but when I take this leftover soup to school, I’m good until dinner. It’s got protein, veggies, and hydration. It feels like a hug in a bowl, but it’s actually fueling your body properly so you don’t crash later.
 2")
The Simple Pantry Ingredients You Need
I absolutely love recipes that don’t make me run to the grocery store at 6 PM. You know that feeling when you are already in your sweatpants, and you realize you are missing one weird ingredient? It’s the worst. That is why this soup is such a winner for me. It mostly uses stuff that is probably sitting in your kitchen cabinets right now. It’s cheap, it’s simple, and it proves you don’t need expensive stuff to make a good dinner. I usually keep these cans on hand just for emergencies when I’m too tired to think.
The Beans: Canned vs. Dry
Okay, so if you are a food purist, you might say dried beans are better. And sure, maybe they have a slightly better texture if you have 12 hours to soak them and simmer them. But I am a teacher with a full-time job and a family. I do not have time for that on a Tuesday. I always use canned beans for this.
I usually go for Cannellini beans because they are nice and creamy, but Great Northern beans work just as well. Honestly, I’ve even used chickpeas in a pinch when that was all I had, and it was still pretty tasty. The big trick here is to drain and rinse them really well in a colander. You want to wash off that thick, starchy liquid they sit in. It helps the flavor of the soup stay clean and not taste “tinny.”
The Veggie Base (The “Mirepoix”)
This sounds like a fancy French cooking term, but it’s literally just onions, carrots, and celery. This trio is the flavor base for almost every good soup I know. I try to chop them all about the same size so they cook evenly. There is nothing worse than biting into a giant chunk of raw carrot when everything else is soft.
I will admit, sometimes I don’t have celery in the fridge. If you don’t have it, don’t stress. The soup will still be good without it. But definitely don’t skip the onion and garlic. I use a yellow onion for sweetness, and for the garlic, I always use way more than the recipe says. If it calls for two cloves, I’m putting in four. Garlic is life.
Herbs and Liquid Gold
For the liquid, I grab whatever box of broth is on sale. Vegetable broth keeps it vegetarian, which is nice if we are trying to do “Meatless Monday,” but chicken broth gives it a really homey, savory taste. Use what you like.
For herbs, fresh parsley is great to sprinkle on top at the end to make it look pretty, but for the actual cooking, dried herbs are totally fine. I use dried oregano and thyme. Just make sure your spice jars aren’t five years old. I learned the hard way that old spices basically taste like dust. If you rub the dried herbs between your fingers before dropping them in the pot, it wakes them up a bit and makes them smell amazing.
 3")
Step-by-Step: How to Make Easy Mediterranean Bean Soup
I used to think making soup from scratch was this big, complicated production. I imagined chefs in tall white hats stirring giant cauldrons for hours. But honestly, this recipe is so forgiving that it’s hard to mess up. It’s mostly just chopping a few things and then letting the stove do the work while you go sit down. Here is how I get it done on a busy Tuesday when I’m barely functioning.
Getting the Base Right
First things first, grab a nice heavy pot. I use a Dutch oven, but any big soup pot works. Put it on medium heat and pour in a good amount of olive oil. Don’t be stingy here! The oil adds a lot of richness.
Toss in your chopped onions, carrots, and celery (if you have it). Here is the important part: let them cook. You want them to get soft and the onions to turn translucent. I usually give this about 5 to 7 minutes. Sometimes I get impatient and try to rush it, but if you don’t cook them enough now, you end up with crunchy onions in your soup, which is just weird.
Once the veggies are soft, that is when you add the garlic. I learned this the hard way: if you put the garlic in too early with the other veggies, it burns and tastes bitter. So, throw the garlic in and stir it for just a minute until you can smell it.
The “Dump and Simmer” Phase
Now comes the easy part. Pour in your broth. I like to use a wooden spoon to scrape the bottom of the pot because all those little brown bits stuck to the bottom are pure flavor. Then, dump in your cans of beans (rinsed!), the diced tomatoes with their juices, and your dried herbs.
Turn the heat up just to get it boiling, then turn it down to low. You want a gentle simmer, just little bubbles coming to the surface. Put the lid on, but leave it cracked open a tiny bit. Now, set a timer for 15 or 20 minutes. I usually use this time to wash the cutting board or, let’s be real, scroll through my phone on the couch. You don’t need to babysit it.
The Secret to Creamy Soup
Here is my favorite trick. When the timer goes off, take your spoon or a potato masher and smash some of the beans right against the side of the pot. You don’t want to mash all of them, just maybe a quarter of them.
This releases the starch from the beans and makes the broth thick and creamy without adding any milk or heavy cream. It changes the texture from “watery vegetable soup” to “hearty stew.” Finally, stir in your greens (like kale) and let them wilt for like two minutes. Turn off the heat and squeeze in a little fresh lemon juice. That bit of acid makes all the flavors pop. Taste it, add salt if it needs it, and you are done.
 4")
Swaps and Variations for Picky Eaters
I learned a long time ago that you can never please everyone at the dinner table. If I make something perfectly, my youngest will say it has “too many green things,” or my husband will look around for the meat. That is why I love this soup so much. It is basically a blank canvas. You can change it up based on what you have in the fridge or who you are feeding, and it still tastes amazing. I don’t think I’ve made it the exact same way twice, to be honest.
Switching Up the Greens and Veggies
The recipe calls for kale, and I personally love it because it’s hearty. It doesn’t turn into slime if you reheat it the next day. But I know kale can be a bit… chewy for some people. If you aren’t a fan, spinach is the easiest swap. Just remember that spinach cooks way faster than kale. If you use spinach, don’t put it in until you have turned the heat off completely. The residual heat will wilt it perfectly in seconds.
You can also toss in whatever dying vegetables are in your crisper drawer. I’ve chopped up zucchini and thrown it in with the onions, and it was delicious. Green beans cut into little one-inch pieces work great too. It’s a really good way to hide veggies if you have kids who inspect their food for “healthy stuff.”
Adding Meat for the Carnivores
Strictly speaking, this is a vegetarian meal. But let’s be real, sometimes you want something heavier. My brother won’t consider it a “real meal” unless there is meat involved. The best addition, hands down, is Italian sausage.
If you want to do this, just buy mild or spicy Italian sausage, take it out of the casing, and brown it in the pot first. Break it up with your spoon, then take it out and set it aside on a plate while you cook the onions in the leftover fat (which adds crazy flavor, by the way). Stir the cooked sausage back in right at the end. You can also just shred up some leftover rotisserie chicken and throw it in. It’s a great way to use up leftovers so they don’t go to waste.
Spices and Toppings
The base recipe is pretty mild, which is safe for kids. But if I’m making this just for myself, I like it to have a little kick. I always shake in some red pepper flakes while the onions are cooking. It infuses the oil with heat.
And we have to talk about cheese. A generous dusting of parmesan cheese on top is non-negotiable in my house. It melts into the hot broth and makes it salty and nutty. If you are vegan or dairy-free, nutritional yeast gives a similar vibe, or just drizzle some really high-quality olive oil on top right before serving. It feels fancy without any extra work.
 5")
Serving and Storing Your Leftovers
One of the main reasons I make this soup is for the leftovers. I am not even kidding, it tastes better the next day. It’s like the flavors settle down and get to know each other overnight. I usually make a big pot on Sunday or Monday, and then I have lunch ready for the next three days. It stops me from spending money at the vending machine or the cafeteria, which is a huge win in my book. Plus, coming home to a dinner that is already cooked? That is the best feeling in the world.
What to Serve With It
You can definitely eat this soup by itself, but I think it needs a little “buddy” to make it a full meal.
- Crusty Bread: This is mandatory in my house. You need a thick slice of sourdough or a baguette to soak up that broth. If I’m feeling fancy, I’ll toast the bread and rub a raw garlic clove on it. It’s instant garlic bread without the grease.
- A Simple Salad: Since the soup is pretty hearty with the beans, I like a light salad on the side. Just some mixed greens with a vinaigrette cuts through the richness.
- Toppings: Put a few bowls on the table so everyone can customize their own. I put out red pepper flakes, extra parmesan cheese, and sometimes even a little bowl of pesto to swirl in. My kids think it’s fun to “decorate” their dinner.
How to Freeze It
If you want to be a meal-prep champion, this soup freezes really well. But there is a trick to it. First, let it cool down completely. Don’t put hot soup in your freezer. It brings the temperature of your freezer down and can mess up your other food. I learned that one the hard way when my ice cream got soft.
I use those glass mason jars or plastic Tupperware. The important thing is to leave about an inch of space at the top. Liquid expands when it freezes, and if you fill it to the brim, the jar will crack. I’ve had a glass jar explode in my freezer before, and cleaning up frozen soup shards is miserable. Don’t do it.
Reheating Without Mush
When you are ready to eat it, you have a couple of options.
- Microwave: If you are at work, just pop the lid loose and zap it for two minutes. Stir it, and maybe do another minute.
- Stove: This is better if you are home. Dump it in a small pot and warm it on medium-low.
Heads up: The soup will get thicker as it sits in the fridge because the beans soak up the liquid. When you reheat it, it might look more like a stew. I always add a splash of water or a little more broth to loosen it up again. If you added pasta to the soup, it will definitely have sucked up all the broth. You will for sure need to add liquid then. Just give it a stir and taste it to see if it needs a pinch more salt after adding the water.
 6")
So, that is pretty much it. This soup has saved my sanity on so many busy weeknights. It is warm, cheap, and really tasty. You don’t need to be a fancy cook to make it taste good. Just throw it in the pot and let it simmer.
I really hope you give it a try. It feels good to put a healthy meal on the table that didn’t take hours to make. If you do make it and actually like it, please do me a huge favor and pin this recipe to your Dinner Ideas board on Pinterest! It helps other people find it, and it honestly makes my day to see people enjoying it.
Happy cooking!