You know that sound? Sizzle. Pop. That’s the music of halloumi hitting the hot grill pan! I still remember the first time I tried to grill this “squeaky cheese.” It was a total disaster—I melted it right through the grates. But after years of testing (and eating way too much cheese), I’ve finally cracked the code to the perfect Grilled Halloumi Plate.
It’s not just about the cheese, though that is the star of the show. It’s about the balance. The salty kick of the halloumi needs the crunch of fresh cucumbers, the sweetness of cherry tomatoes, and a zesty dressing to tie it all together. Did you know halloumi has a high melting point, making it the only cheese that truly loves a BBQ? In this article, I’m going to walk you through exactly how to build a restaurant-quality platter right in your own kitchen. Let’s get grilling!
 1")
What is Halloumi and Why Does it Grill So Well?
I still remember the first time I saw halloumi in the grocery store. It looked just like a white block of nothing special, sitting there next to the feta. I honestly didn’t know what to do with it. But once I threw it in a pan, everything changed. If you are new to this cheese, you are in for a real treat. It is totally different from the cheddar or mozzarella you might be used to putting on sandwiches.
A Gift from Cyprus
So, what exactly is it? Halloumi is a semi-hard cheese that comes from the island of Cyprus. Traditionally, it is made from a mix of goat’s and sheep’s milk, though you will sometimes find cow’s milk mixed in with the cheaper versions at the supermarket. I always tell my friends to check the label—if you can find the kind with just goat and sheep milk, the flavor is way better. It has this tangy, salty kick that is just delicious.
Why It Doesn’t Turn Into a Puddle
Here is the thing that confuses people: why doesn’t it melt all over the grill? Most cheeses, like Swiss or gouda, would turn into a gooey mess if you put them directly on a hot BBQ. But halloumi is different. It has a very high melting point. This is because of the way it’s made—the curds are cooked at a high heat before they are shaped.
This means you can put it right on the grates or in a frying pan, and it holds its shape. Instead of melting, it gets this beautiful golden-brown crust on the outside while getting soft and warm on the inside. It’s pretty much the steak of the cheese world.
The Famous “Squeak”
You might hear people call it “squeaky cheese.” That sounds weird, I know, but it is accurate! When you bite into a fresh piece of grilled halloumi, it actually makes a little squeaking sound against your teeth. It’s kind of like biting into a fresh cheese curd.
The texture is firm and a bit chewy, which makes it really satisfying to eat as a main dish. It’s meaty enough that even my husband, who loves his burgers, is happy to have this for dinner. It’s salty, savory, and just feels substantial when you eat it. Once you get past the funny sound, you will fall in love with the taste.
 2")
Essential Ingredients for Your Grilled Halloumi Plate
When I decide to make this dinner, I don’t just grab the first things I see in the fridge. The beauty of a simple plate like this is that every single ingredient matters. Since you aren’t cooking a complex sauce or a stew, you can’t hide bad ingredients. If you use sad, soft tomatoes, the whole thing feels sad. I learned this the hard way when I tried to use up some old veggies from the back of the crisper. Trust me, fresh is better here.
Picking the Real Cheese
First things first, you have to buy the right cheese. Please, don’t buy that stuff labeled “grilling cheese” if it doesn’t say “Halloumi” on the package. I have made that mistake before. It just doesn’t taste the same and the texture is often rubbery in a bad way. You want the block that feels firm. Sometimes, if you look closely at the authentic ones from Cyprus, you can see little bits of dry mint folded right into the layers. That is usually a good sign. It might cost a dollar or two more, but for a meal where the cheese is the main event, it is absolutely worth it.
The Fresh Crunch
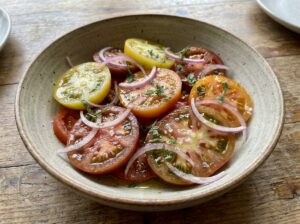
The cheese is salty and chewy, so you need something to cut through that. I always grab English cucumbers. You know, the long skinny ones wrapped in plastic? They have fewer seeds and are way crunchier than the regular fat ones. I slice them into rounds or thick sticks. Then, cherry tomatoes. They are sweeter than big tomatoes. When you bite into a warm piece of salty cheese and then a cold, sweet tomato, it is just perfect. I also like thinly sliced red onion, but here is a teacher trick I learned: soak the onion slices in ice water for ten minutes while you prep. It takes away that harsh “onion breath” smell but keeps the crunch.
Don’t Forget the Bread
You need a vehicle for all this goodness. I usually go for pita bread. But do not just serve it cold out of the bag! Since the grill is already hot for the cheese, I throw the pita on there for just a minute. It gets warm and soft with little crispy edges. If I can’t find good pita at my grocery store, a nice slice of sourdough bread toasted with a little olive oil works great too.
The Flavor Boosters
Finally, you need the finishing touches. A lemon is mandatory. Squeezing fresh lemon juice over the hot cheese wakes up all the flavors. I also keep a pot of fresh mint on my windowsill just for this. Dried herbs are okay in a pinch, but fresh mint leaves torn over the top make it look and taste restaurant-quality. And of course, your best olive oil to drizzle over everything at the end makes a huge difference.
 3")
How to Grill Halloumi Perfectly (Step-by-Step)
This is the part where people get nervous, but I promise you, it is not rocket science. I used to be scared I would ruin the expensive cheese, but once I figured out a few simple rules, it became the easiest part of the meal. You don’t need a fancy outdoor grill for this, either. In fact, I usually just use my trusty cast iron pan right on the stove because it’s easier to control the heat. If you follow these steps, you won’t end up with a rubbery mess.
Step 1: Slice It Right
Open up the package and drain that liquid. Now, you need to cut the block into slices. This is where I see people mess up the most. If you cut the slices too thin, they dry out and turn into hard chips. If you cut them too thick, the middle stays cold and rubbery. I aim for slices that are about 1 centimeter thick. That is roughly the width of your pinky finger. Try to keep them all the same size so they finish cooking at the same time.
Step 2: The Secret Dry Step
This is the “teacher tip” that will change your life. Do not skip this! Halloumi comes out of the package very wet. If you throw wet cheese into a hot pan, it steams instead of frying. You won’t get that yummy brown crust; you’ll just get hot, soggy cheese. So, take a paper towel and pat each slice dry on both sides. You want to get as much moisture off the surface as you can. It takes an extra minute, but the result is so much better.
Step 3: Heat Management
Get your pan nice and hot over medium-high heat. You don’t need a ton of oil. I usually just brush a tiny bit of olive oil on the cheese slices themselves, not the pan. The cheese has fat in it that will release as it cooks. If you put too much oil in the pan, it gets greasy. Place the slices in the pan. You should hear a loud sizzle immediately. If you don’t hear that sound, take it out and wait. The pan isn’t ready.
Step 4: Leave It Alone!
Now, the hard part: doing nothing. Put the cheese in and don’t touch it. I know you want to peek, but let it sit there for about 2 to 3 minutes. You want a deep golden-brown color. If you try to flip it too early and it sticks, it means it’s not ready. It should release from the pan easily when the crust is formed. Flip it over and give the other side another 2 minutes. Once it’s golden on both sides, take it off the heat immediately. It is best served right away while it’s still soft and warm inside.
 4")
Assembling the Ultimate Platter
Now that your kitchen smells amazing and the cheese is hot off the pan, it is time to put it all together. I honestly think this is the most fun part. It reminds me of doing art projects with my students—you get to be creative with colors and shapes. You don’t just want to pile everything in a heap. We eat with our eyes first, right? Plus, if you arrange it nicely, you can trick your family into thinking you spent hours cooking when it really only took twenty minutes.
Laying the Foundation
I like to use a big, wide platter for this instead of individual plates. It makes dinner feel like a party, even if it is just a regular Tuesday. Start by laying down a bed of greens if you are using them, like arugula or spinach. But here is a tip: don’t put the hot cheese directly on the delicate leaves right away, or they will get soggy and gross.
I usually arrange the cucumber slices and tomatoes around the outside edge of the plate. This creates a nice colorful frame. Then, I pile the warm pita bread on one side. If you have the red onions, scatter them over the vegetables so you get a little bit of onion in every bite without getting a huge mouthful of it at once.
The Dip Station
You cannot have a dry plate! I always add a big scoop of hummus or tzatziki right on the platter. I used to try making my own hummus, but let’s be real, who has time for that during the school week? I just buy the tub from the store.
To make it look fancy, I use the back of a spoon to make a little swirl in the top of the hummus and drizzle a tiny bit of olive oil in there. It looks like something from a restaurant. Place this dollop near the bread so it is easy to scoop.
The Main Event and Dressing
Now, place your beautiful, golden halloumi slices right in the center. They are the star, after all. While everything is on the plate, I mix up a super quick dressing. I don’t use a blender or anything. I just grab a small jar, pour in some olive oil, a squeeze of lemon juice, a pinch of salt, and some dried oregano. Shake it up and pour it over the veggies and the cheese. The acid in the lemon cuts through the salty cheese perfectly.
The Final Sprinkle
This last step takes two seconds but makes a huge difference. I like to sprinkle something on top for texture. Toasted sesame seeds look great, or a pinch of red pepper flakes if you like a little heat. Sometimes I sprinkle sumac if I have it in the cupboard; it has a tart flavor that works really well. Now, stop looking at it and eat it before the cheese gets cold!
 5")
Serving Suggestions and Pairings
So, you have made this beautiful plate of food. Now, what do you do with it? I have served this dish for so many different occasions, from a quick solo dinner on the patio to a big family get-together. It is super versatile. But, because the cheese is so distinct, there are definitely some things that go better with it than others. You want to make sure the sides and drinks don’t fight with that salty flavor.
What to Drink With It
I am going to be honest, after a long week of work, nothing beats this plate with a cold glass of white wine. Since halloumi is very salty, you need a drink that is crisp and acidic to balance it out. A Sauvignon Blanc is my absolute favorite choice here. It has that zesty, citrusy taste that cuts right through the heaviness of the cheese. It cleans your palate so every bite tastes just as good as the first one.
If you aren’t into wine, that is totally fine. My kids obviously aren’t drinking Sauvignon Blanc! I usually make a big pitcher of iced tea for the table. I throw in some of the leftover mint stems and maybe a few slices of lemon. It is refreshing and cools you down if you added chili flakes to the cheese. Sparkling water with a splash of cranberry juice is also really nice and festive.
Is This a Snack or a Meal?
I get asked this a lot. Can I eat just cheese for dinner? The answer is a hard yes. If I am making this for myself or just me and my husband, I count it as the main course. I usually allow for about three or four slices of cheese per person. If you pile on enough pita bread and salad, you will be stuffed. It has plenty of protein, so you won’t be hungry an hour later.
However, if I am having people over for a barbecue, I usually serve this as an appetizer. I cut the cheese into smaller bite-sized cubes instead of big slices. Then I put toothpicks in them so people can grab one while they wait for the burgers or chicken to finish grilling. It is a great way to keep everyone happy without filling them up too much before the main event.
Changing It Up for the Seasons
Even though I think of this as a summer meal, I make it year-round. But I do change the toppings depending on what looks good at the store. In the middle of summer, I swap out the tomatoes for grilled peaches or nectarines. I know fruit and cheese sounds weird to some people, but trust me on this one. The warm, sweet fruit with the salty cheese is like a flavor explosion. In the fall, I might use roasted beets or figs instead. It keeps the meal exciting so we don’t get bored of it.
 6")
Well, there you have it! Making a Grilled Halloumi Plate at home is honestly one of the most rewarding meals you can whip up, especially when you are short on time. It is salty, fresh, crunchy, and satisfying all at once. Whether you are hosting a big summer barbecue or just want a quick vegetarian dinner on a busy Tuesday night after work, this platter never disappoints.
I really hope you give this a try. It is one of those recipes that looks impressive but is secretly super easy. Just remember to eat it while that cheese is still warm and squeaky for the best texture! If you try it, let me know how it turned out.
Did you love this recipe? Don’t forget to pin this Grilled Halloumi Plate to your “Mediterranean Recipes” board on Pinterest so you can find it later!